Why the Omega Alteration keeps messing up your armpit (and how to fix it)
There are a few different adjustments you can make when altering a pattern to fit a smaller frame - Emerald Erin has a great rundown here. One that I have mentioned before on this blog is called the omega adjustment.
Now, a bugbear of mine is that while this is called the omega adjustment, doing this alteration doesn't mean your breasts are omega shaped. You can need a smaller wire than intended for your size range without being omega shaped, and this is known as being projected - if you need a truly omega shaped bra, additional alterations will be required. I just thought I'd mention this here to avoid confusion, but the link above goes into this in more detail.
You can read an extended version of this post and many of my other bra making blog posts for just £2 on my Ko-fi, and make a monthly pledge to continue supporting my blog if you want!
Theory Behind the Omega Alteration
Let's stop thinking about bra cups for a minute and instead start thinking about their geometric grandparent: the cone. I love cones. Unlike most things in my life, cones are simple and perfect.
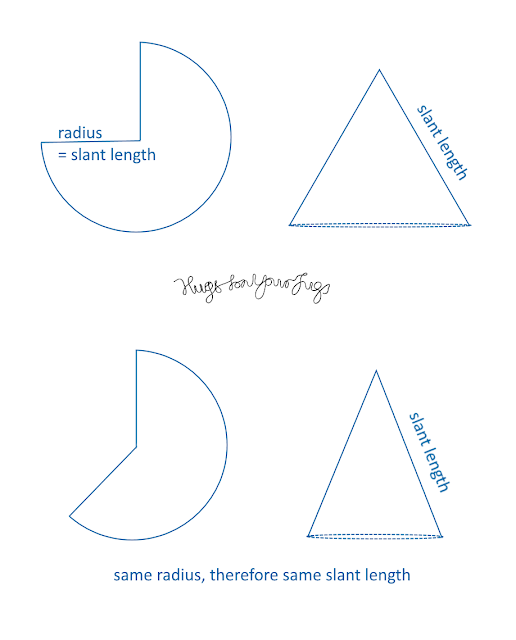
We can make a cone by first drawing a circle. The radius of this circle will become the slant length of the cone. We can then cut out a sector of our circle. The circumference of the remaining sector will be the circumference of our final cone's base.
If we want a cone with the same slant length but a smaller base circumference, we can simply reduce our circle sector.
And so it goes with bras - when you size down in the wire, the wire becomes shorter so we must reduce the wireline length of the cups. If we want to do this, but maintain the horizontal hemisphere of said cups, we just need to reduce the circumference of the outer line. Note that for the purposes of this post I will be talking about the "wireline circumference". This is the same thing as the "cradle length" and is the measurement of the total length of the seam between the cups and the cradle.
However, because a bra is not symmetrical like a cone, we need to spread this reduction evenly across the wireline circumference.
 |
| A smaller wireline circumference leads to a bra with the same horizontal hemisphere (ie same "slant length") |
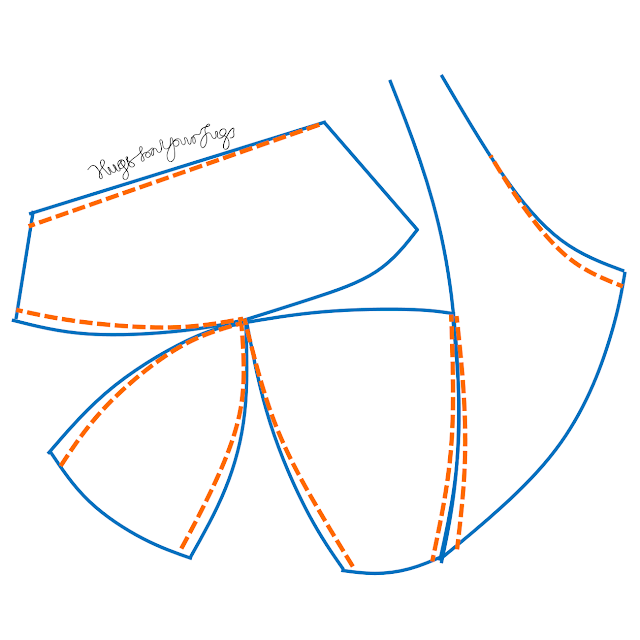
So you end up altering it like this, blending a smaller wireline into the deep cup you need.
Where the Omega Alteration Fails
There's two issues that arise from the omega alteration, one more minor and one quite major.
Minor Issue - Cup Proportions in Larger Sizes
As much as I and Madonna may wish they were, bras are not cones. They sit on our rib cages. In larger cup sizes especially, bras wrap around our bodies.
 |
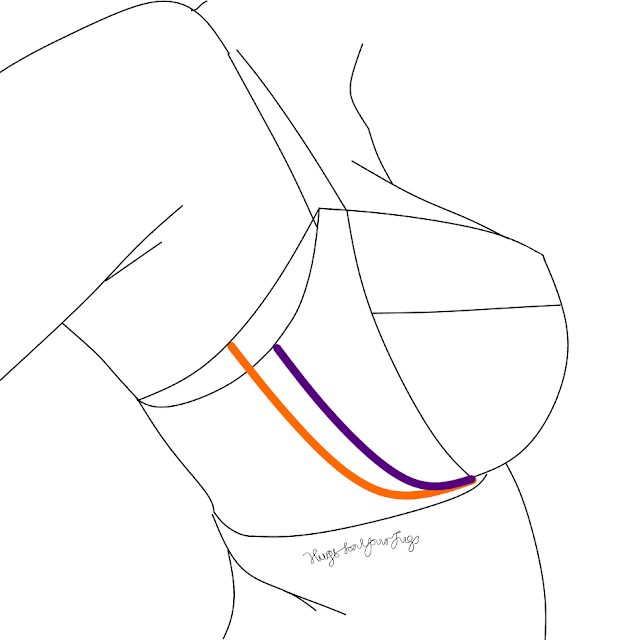
| How a larger and smaller wire sits on a torso |
What this means is that in a well designed bra, in larger cup sizes, the cup will not protrude directly outwards from the wire at the side but instead sit more flush to the body. When we move to a smaller wire size, that wire sits more forwards on our body, but the cup protrudes out at a similar angle.
 |
| If we perform an omega alteration, the power bar seam will sit further forwards on our body |
It's best to demonstrate this issue with a bra with a power bar. When we do a straight Omega alteration, the cup proportions - and thus the width of the outer cup - along the horizontal hemisphere remain approximately equal. This means that the outer cup is pushed forwards, potentially making the side of the cup too wide and sit too far forwards on the body.
Major Issue - Armpit and Neckline
This issue affects smaller and larger sizes, but is more of an issue in larger cup sizes and greater reductions in wirelines.
See, when I said before we needed to reduce the bra cup evenly to maintain the correct proportions, I was right. But the omega alteration doesn't actually do that at the neckline.
This is because we are basically just altering the bra to fit the wireline, but the neckline proportions are maintained. This means that, compared to the width of the wire (and the wireline circumference), the neckline circumference is much greater.
What this usually manifests as is a big space at the armpit. This is because of the proportions issue written above, the extra space gets pushed to the side (although it may also appear at the front). Even if there's not visible space at the armpit, the reduced tension in the upper cup can cause the cup to kind of sploot outwards and lose some support.
Fixing Your Omega Alteration
Note: I have recently devised a different way of altering your bra to fit a smaller wireline. I am keeping the rest of this blog post for reference but I advise following the advice given in the more recent one instead.
Both of the issues listed above are more apparent the larger your overall cup volume, and the greater your adjustment to a smaller wire. If you are altering your cradle down one or two sizes, you may not need to do it at all. It's worth bearing in mind that the issues can crop up though in case they do.
Fixing the Omega adjustment is more of an art than a science, because bras are not perfect cones, and the neckline is often not full coverage and sits away from the body. Simply reducing the neckline circumference by the same amount you reduced the lower cup circumference would cause your neckline to be much too closed off, becuse the neckline of a bra typically sits away from the chest rather than right up against it like the wireline does. A higher coverage bra will need more neckline adjustment than a lower coverage bra by for this reason. Also bear in mind that there can be additional cup proportion issues not mentioned here that you may also need to contend with.
The easiest thing to do is to make the omega alteration and then put a dart into the armpit (and possibly and additional one in the neckline) as needed. The long armpit dart helps to both shorten the neckline and bring the side cup more into proportion.
If I come up with or come across a better way around it, that can be done during the initial alteration, I'll let you all know!
Cup Height and the Omega Alteration
I don't wish to overcomplicate the message of this post, so I've written a more open-ended discussion about upper cup geometry as it relates to the Omega alteration, which you can read for £2 by supporting me on my Ko-fi.
Do you experience cup fit issues after performing the omega alteration? How do you tackle them?


This article is amazing in its technical detail. I'm struggling to understand some of what you wrote, but thank you for the thorough analysis, drawings, markings, and explanations!
ReplyDeleteThank you. I have a reel on instagram (@HugsforYourJugs) that has 3D paper models of cups, it might help with your understanding.
DeleteDo you put in a dart as in like a bust dart on a garment (the excess fabric remains in the item) or do you adjust the pattern? Can you please share the reason behind it?
ReplyDeleteThe pattern is adjusted, so the excess fabric is removed. The reason is to reduce excess bulk, it's not necessary to have the extra fabric because there are lots of pieces in the bra cup so the "dart" is moved to one of the spaces between the seams - this video explains the idea pretty well
Deletehttps://www.youtube.com/watch?v=YPg9KG6Simo
Thank you!
DeleteThanks for providing the technical reasons for the adjustments that I've had to do. It's a relief to know that I'm not doing something wrong! I have to do both adjustments you show (cup size 38 G/H, wire size 46), but no other discussion of omega shapes has ever mentioned it. It is a fiddly thing to get "right", where right means "fits the way I want".
Delete