
Galina by Madalynne Review & Debug (Part 2 — Cups)
I was hoping to do a play-by-play alterations process for these cups but as it took me a long time to truly understand what was going on with them — and 8 toiles to fit it — it’s better if I summarise what I’ve learned about the fitting of this bra and how to address various fit issues. Mine still isn’t completely perfect but it’s very functional and I’m happy with it. If I were to fit it on someone else I believe I could do it a lot faster and have a more successful result overall. Be sure to check out the cradle and band fitting process in part 1 if you missed it.
This post was released early to my lovely supporters on Ko-fi. To
get early access to posts, or access to extended editions of posts, you
can support me for just £2/$3 a month!

Here
are the original pattern pieces after reducing the wireline (top), and my final cups after alteration (bottom)—
you can see that significant changes have been made. So I will try to
talk you through the differences and the rationale behind all of them.
Overall Cup Size
Firstly: these cups run very small. My measurements pointed to the 28G/H on the size chart, but I knew looking at the pattern pieces that that would be tiny, so I instead compared the pattern measurements to other bras I own and chose to initally make the 38G/H, 5 sizes bigger.
 |
| While the smaller cups have also had their wirelines altered, you can see the difference in cup radius as denoted by the straight black lines |
I darted the pieces from wireline to apex to fit my 100 wire/cradle but did not alter the neckline. This was also a bit on the small side, and I went up to the 42G/H. This was too large and ultimately caused some further issues as I was reluctant to size down and make a bunch of alterations a second time. In retrospect, I should have moved to 40G/H and made alterations to increase the height of that while loosening the inner strap, which I had overtightened at first (due to not understanding the bra until midway through my alterations).
Suffice it to say, be careful with the size you choose and double check you are wearing the straps correctly before making alterations, being prepared to move up or down sizes based on how it fits with comfortable straps. I would not recommend this bra to someone who does not yet own well fitting seamed bras to compare it to, size wise (and fit wise to be honest).
 |

Here are the same cups in my well fitting band and cradle. You can see there’s no improvement : it’s not supportive, there’s still neckline issues, the cups are very separated and there’s spillage out the centre front. The cups have become “smaller” due to the wire sitting properly, and while the wrinkles are reduced the fit leaves a lot to be desired.
I could’ve hiked my straps super tight and pulled them inwards on my shoulders (a la the advertising) to impove the lift, but I wanted to make something comfortable, and doing that would cause pain. I noticed that when I was fitting I did have the tendency to try and tighten up the straps to improve the fit — which of course trigged those shoulder aches. Once I made the decision to consciously keep the straps at an appropriate tension, and reevaluate the cup fit of subsequent toiles in relation to this, my fitting became a lot more successful.

The final fit, for comparison. You can see that there is still some tissue dropping below the wireline which is not intended, and some space in the upper cup (the wrinkle is the exterior fabric, but there is still space in that area) — this is due to the single seamed shape in larger cups, which I discuss more below. I feel I have achieved a nicer centre shape, there is no longer any neckline spillage, and I much prefer this new silhouette.
Neckline Space, Centre Spillage, and dealing with the Inner Strap
Neckline space and centre spillage areissues that you are very likely to encounter in this bra for large cups. These issues stem from that centre strap. Issue number one: straps pull in the direction they’re oriented, and because this strap is angled outwards, it pulls laterally on the neckline, causing space. Issue number two is that because the strap cuts across where breast tissue is situated, any amount of tension on it is likely to cause spillage/cutting in in larger sizes.
 |
Because of these issues, I realised that this bra structually needs to be treated like a plunge with a decorative, non functional strap — at least in my size. Miniguinea posted her Galina on Instagram and it seems she took a different approach, making the bra more of an encapsulation style: fitting the centre straps on the flat of her chest, surrounding her tissue, to avoid cutting in. This is a viable solution in smaller cups and potentially larger but very separated breasts, but mine would also work if you want a bit of cleavage/a plungier style in a smaller size.
The other issue with the inner strap is the angle it connects to the cups. Because straps can only pull along their length, your strap attachment point needs to sit on the straight line from wire to shoulder, or it will pull on your neckline and it will have space, even with very little strap tension. To fit this, put the bra on and look at the line from your shoulder to the cradle of your bra where the attachment sits. Bring your inner cup over until it hits this line somewhere. I had to move mine significantly, although how much depends on your bust size, shape, and torso proportions.
I believe that in general, the inner strap attachment in larger cups is set too medially, causing excess neckline fabric along the line the strap actually sits. I believe that more likely than not you will have to move it back out. If you are experiencing neckline gaping, DO NOT shorten your neckline to address this until you are certain your strap is positioned well, you will just push your breast down and still have space in the neckline. Ask me how I know lol
 |
| Original (right) vs my altered inner cup (left), showing the differences in inner strap positioning and inner cup coverage |
You can see here the change in angle for the inner strap attachment
point. Coverage at the centre front was also increased because I have a
lot of tissue for the fabric to round over when the strap isn’t being
pulled tight.
Outer strap, Neckline and Seam Truing
The outer strap is pretty important in a bra, especially in larger cups.
Its positioning can have big implications for the support in a bra.
 |
| The original cups (right) relied on heavy support from the inner strap, but my altered cups (left) behave more like a plunge |
For larger cups, the strap attachment point needs to sit higher in relation to the wire tip than smaller cups. Aside from increased height to maintain proportionality on a taller wire, we need additional height for large cups for two reasons:
1 — IME, as breasts get larger they generally become taller in comparison to the height of the underwire, so more tissue will sit in that upper cup
2 — As breasts get heavier, in styles like half cups, a higher strap = a more diagonal neckline, which helps with supporting the upper cup.
So with increasing cup size you would expect to see disproportionately higher strap points. In this bra, the strap attachments are proportionately higher in all cups, which is a good start. However they only disproportionately increase in height in the cups for 28–34ish band sizes. In the larger band sizes, the angles at the strap remain the same (except for the G-H cups in some sizes? idk it’s odd)
All of this means that in larger cup sizes, be prepared to raise your strap height, even if you don’t want a plunge shape.
An additional, largely minor (but still annoying) issue with this pattern is that the cup neckline seam isn’t trued — this is something you need to do yourself otherwise you’ll get a V shape in your bra at the seam. To do this, align your pattern pieces at the cup seam, then draw a straight or curved line from the strap attachment point to the inner strap attachment point.
 |
Lift!
You
may have problems getting a satisfactory amount of lift in this bra.
Indeed, my finished bra has a little less lift that I wanted. But it's much better than my drafts - here are the things I
focused on to improve lift.
1 - Check your vertical apex position. Larger
cup bras typically need higher apexes compared to their wire than
smaller cup bras, and while the Galina does account for this, the apex
is positioned pretty low in every size, even the largest ones.

The apex in this bra is set pretty low compared to the
wire tip - even single seamed halfcups typically have higher apexes than
these in larger cups. Even mine is a little on the low side to be honest
- I intended for it to be where the line ends but it ended up actually
being lower than that due to how I drew the curves. A low apex means
your tissue naturally will be situated low in the cups.
2 — Check your strap position. A too low strap could be wasted opportunity to support tissue in the upper half of the cup, as mentioned above.
3 — Make sure your neckline isn’t too short!
As mentioned above, an incorrect inner strap positioning can cause neck
gaping no matter if the neckline actually is too short or not.
Shortening the neckline without addressing this causes the neckline to
continue having space, but now your tissue is pushed down in the bra.
Look out for other signs that your upper cup may be too tight, such as
little horizontal dimples/wrinkes along the vertical seam.
4 - Keep an eye out for excessive vertical circumference vs height from wire to strap attachment
If your cup is overall a bit large, you can struggle to get lift, as there is excessive vertical circumference in the bra. Consider sizing down, and adding height to the strap attachment/neckline to this smaller size if the cup looks a bit small overall or you find yourself overtightening the straps.
East/West, Apex
If you’ve looked at the promotional material for this bra, the separated breast look in larger cup sizes should come as no surprise. You can fix it! Here’s what I did to make my bra more typical in appearance:1 — Make sure your cup seam hits the wireline at the balance point. In the 28G/H cup pieces (which I copied the wireline lengths of), it was positioned slightly too far out. You could potentially consider bringing it in even further for more diagonally seamed cups.
2 — The apex needs to be moved in considerably. I moved my apex both inwards and upwards, around xcm inwards and ycm upwards.
3 — Keep that inner strap nice and loose to stop it pulling your tissue to the sides.

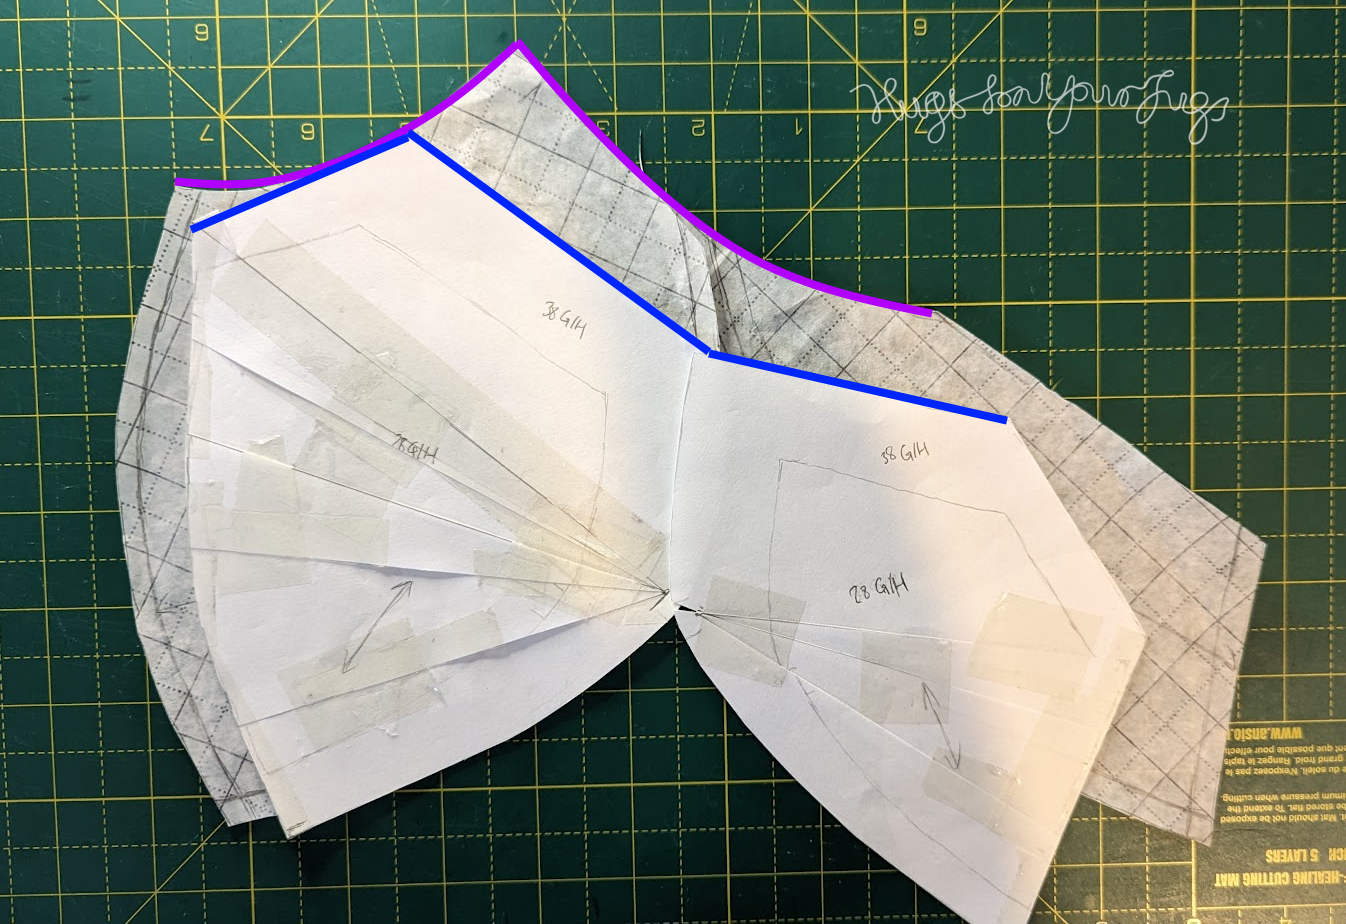
We can see these changes in action in the pattern pieces. The proportion
of outer cup width to inner cup width for the purple (new) vs blue
(old) lines has changed significantly. The new cups have greater
coverage (height) at centre front, and the wireline for the outer cup
has increased slightly to move the seam at the bottom.
Materials & Cup Design Considerations
My bra has space near the outer strap — no surprise there really, I don’t have breast tissue in that area and it’s a single seamed bra. If the space bothered me, I would consider adding in a diagonal upper cup seam (like a traditional plunge). I suspect this would also improve support overall.
 |
| There is space in the circled region. The purple lines on that cup show what could reduce this space. The purple line on the other cup shows a potentially slightly nicer seam angle than the one I have, but this would not fix the space. |
I chose to use a single layer of bra tulle in my cups instead of the recommended spowernet — what can I say, I’m cheap! I think this tulle is a little lacking in support given the single seam, using a double layer (or a different material entirely) would probably help although I didn’t test it.
For my final bra I decided last minute to add an inner bra tulle sling, honestly it doesn’t really help much with the lift — I would skip it personally, and just choose a stronger fabric overall. Given that it’s a single seamed cup with a reasonably soft wire, we can’t expect miracles from it.
Thanks again to my supporters on Ko-fi for supporting my blog. If you like my posts and want to help out, you
can support me for just £2/$3 a month!
The bra turned out great, especially given the orginal monstrosity you had to work with.
ReplyDelete